|
Install and launch Proxifier. The Proxifier icon showing traffic (information
flow) will appear on the taskbar. Double click the icon to open the main window
of the program.![]()
By default, Proxifier is configured to process all network connections (TCP/IP)
on the system. Thus Proxifier will manage all internet applications and allow
them to directly connect to the internet. So if you gain access outside your
network without a proxy you can still utilize the features of Proxifier (bandwidth,
individual application control, etc).
To make the connections work through a proxy server or a chain of proxy servers,
you must first specify their IP address and port. Click Proxy Settings
in the Options menu or click on the icon located on the toolbar:
|
|
WARNING: If you were using proxies before you installed the Proxifier, then you should disable any old proxy settings. This means that your applications should be configured to connect "directly" to the Internet (rather than through proxies). |
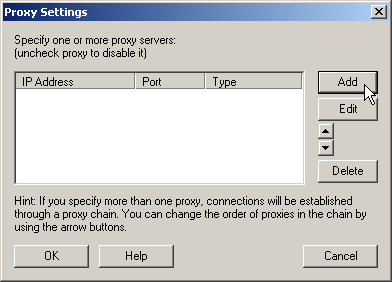
Click the Add button in the new dialog window:

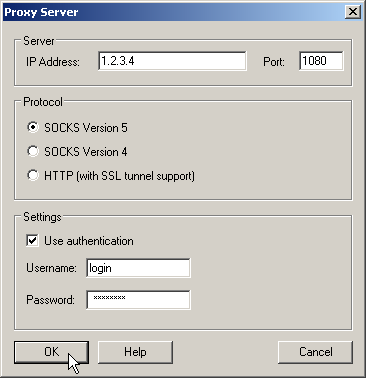
Fill in the form specifying the parameters of the proxy server (type, address, port) that you want to add and click OK:

(this is not a real proxy, only a sample)
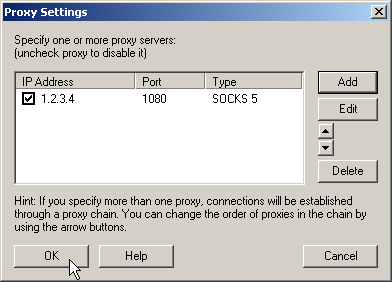
Your proxy server will appear in the list, click OK to confirm the use of this server:

From now on all new network connections will be established through the specified
proxy server.
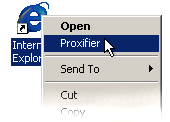
If you do NOT want to "tunnel" all connections, but only separate programs, click the Process Only the following + Manually proxified applications item in the Options -> Proxification Rules dialog window. Then, to "tunnel" any application, right-click on its icon shortcut and click Proxifier in the context menu.

The application will be started and all its connections will work through the specified proxy server.
Another way to tunnel only selected connections is Proxification Rules.