Profile Auto Update
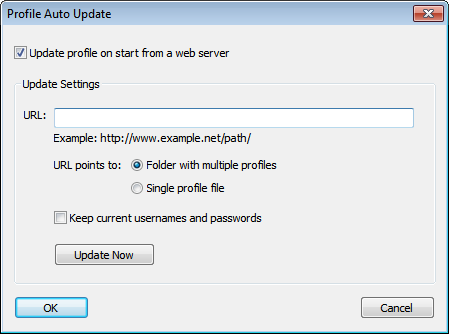
Proxifier can update profile automatically on start. To enable this feature, please go to File‑>Profile Auto Update... and check Update profile on start from a web server.

Here you can specify a URL that will be used for update. It should start either with http:// or https://
HTTP Redirects are supported.
Update Now button starts the update immediately. When the update is working, Stop button becomes available to stop the process.
There are two update modes available:
- Folder with multiple profiles. The URL points to a folder. Proxifier will search for the currently used profile in this folder. Update is performed if there is a profile file with the exact name.
- Single profile file. The URL points to a single file. Proxifier performs automatic update only if the file name matches current profile name. Update Now button updates the profile regardless the name.
Keep current usernames and passwords option allows keeping login information during the update. Proxifier checks for the same proxy servers in the new profile. If the same proxy is found – login information for this proxy gets copied to the updated profile.
A typical auto update session looks like the following:
(Log‑>Output Level‑>Verbose enabled).
[12.13 15:10:29] (Profile Auto Update) - Update started.
[12.13 15:10:29] (Profile Auto Update) - New profile has been downloaded.
[12.13 15:10:29] (Profile Auto Update) - Profile Work has been successfully updated from the remote server.
[12.13 15:10:29] (Profile Auto Update) - Saving login details for proxy 192.168.1.1:1080
